


The holidays are the season of sparkle, nostalgia, and a little bit of extra flair. Your nails are one of the easiest ways to join the celebration. Whether you are heading to a work party, a family gathering, or staying in with a cup of cocoa and your favourite playlist, these five DIY friendly nail designs will elevate your festive mood without requiring a salon appointment. All you need is a steady hand, a few colours, and a bit of creativity.
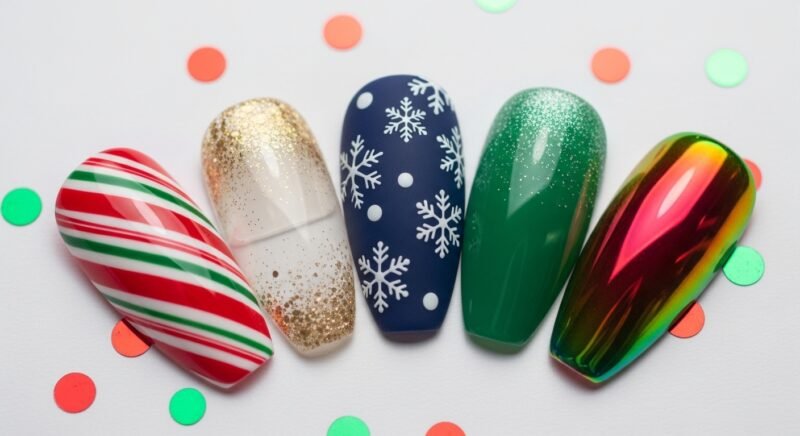
1. The Classic Candy Cane Stripes
Vibe: Cute, nostalgic, festive
You’ll Need: Red polish, white polish, striping brush or tape
This timeless look is surprisingly easy to recreate. Paint your nails white and allow them to dry completely. Place thin strips of tape diagonally across each nail. Fill in the exposed spaces with red polish, then peel off the tape gently. Finish with a glossy top coat. It is sweet, simple, and perfect with both neutral outfits and bold red lips.
2. Golden Snowfall Tips
Vibe: Soft glamour for dinners and office parties
You’ll Need: Nude base polish, gold glitter polish, sponge
Start with a soft nude base. Once dry, dab a gradient of gold glitter on the tips using a makeup sponge. The result looks like snowfall catching warm light. It is elegant enough for formal events and playful enough for casual moments.
3. Evergreen Gradient
Vibe: Modern, moody, rich in character
You’ll Need: Dark green polish, lighter green polish, sponge
Paint your nails with the lighter shade. After it dries, use a sponge to tap the darker green from the tip downward. This creates a seamless ombré. It is a chic alternative to the traditional red and gold colours of the season, and the deep green hints at winter pines without being literal.
4. Snowflake Accents
Vibe: Icy, whimsical, quietly luxurious
You’ll Need: Light blue polish, white polish, dotting tool or toothpick
Apply a soft winter blue, then add small snowflakes on one or two accent nails. Use a thin brush or toothpick to draw simple lines or small dots arranged in a star pattern. Even imperfect snowflakes look intentional because natural snow never matches either.
5. The Festive Chrome Glow
Vibe: Trendy, glossy, high shine
You’ll Need: Metallic chrome powder, matching gel polish
Chrome nails are still one of the biggest holiday beauty trends and they are easier to create than they look. Apply your gel colour, cure it, rub in the chrome powder, and seal with a top coat. Silver gives a frosty finish and red gives a molten and dramatic look. Both reflect light beautifully and are very camera friendly.
Tips to Make Your DIY Nail Art Look Salon Level
- Prep properly. Buff, shape, push back cuticles, and clean with alcohol.
- Use thin layers. Thick coats chip faster.
- Seal the edges. Cap the tip with top coat for durability.
- Use quick dry drops or spray to prevent smudging.
- If you are in a rush, add holiday stickers or decals for instant detail.
The Holiday Mood Begins at Your Fingertips
Nail art is one of the simplest ways to express your festive spirit, and you do not need professional tools to achieve something beautiful. Whether you love sparkly, minimalist, or playful designs, these five options provide something for every style and skill level. Brew something warm, press play on your favourite holiday film, and let your nails take part in the celebration.